Video Article 2:
Refinishing Wooden Propellers.
Does your wooden aircraft propeller look bad and need to be refinished? If so, here’s how to do it.
First, check your prop carefully for small chips, dings, and nicks. These can be filled with epoxy and sanded smooth before refinishing.
Sand the damaged areas down to bare wood with 40 or 60 grit sandpaper. Then blow off the dust with compressed air, and inspect the damaged area. If you still have some damaged wood, repeat the process until all the rough edges of the damaged area are sanded smooth.
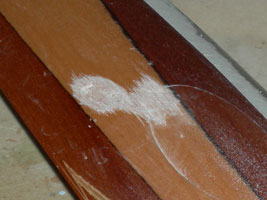 |
Epoxy comes in many different colors and consistencies. Choose an epoxy that’s clear or amber color and has the consistency of honey. If you are going to be painting your prop so the epoxy won’t show, they obviously color doesn’t matter. |
| Cover the undamaged wood near the damaged areas with masking tape. Then drip epoxy in the damaged areas and make sure that it won’t flow off the prop before it cures. You may want to gently put a layer of masking tape on top of the wet epoxy to help keep it in place. Then set the prop aside and allow the epoxy to dry for at least a day. | |
| If you are skilled with power tools, you can use an angle grinder with a coarse sanding disk to remove the excess epoxy. But remember, just a small slip can seriously damage the wood, maybe even beyond repair, so switch to a sanding block as soon as the epoxy fits evenly with the wood, and sand off the old finish by hand. | 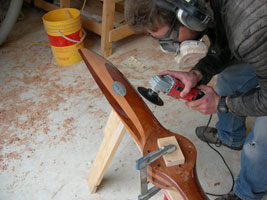 |
| Sanding your prop is easiest using urethane foam sanding blocks. These blocks are slightly flexible, so they work better for sanding the many curves on a prop. Gluing sandpaper to a 2x4 just isn’t a good idea. So get some high density urethane foam blocks and make your own prop sanding blocks. They should be 8 to 12 inches long. | [Photo 2: V-2-4 Slightly flexed foam sanding block] NOT AVAILABLE |
|
Start sanding with 60 grit sandpaper, then work up through finer grits all the way to 400. You don’t need to sand all the way to bare wood if the old varnish is good. Just sand it smooth and make sure you have all the scratches removed. The dark spot in the middle of this prop is what a epoxy repair should look like after it has mostly been sanded smooth. Be especially careful when sanding over a label that’s been varnished because it’s easy to sand off the edges. Also, you’ll need to use paper on your open hand when sanding around the hub. Don’t worry too much about accidentally sanding through the original layer of varnish, you’re about to give it a new coat anyway. When you’re done sanding, clean the prop, first with a dry paper towel. Next put some of the same kind of thinner you plan to use for thinning your varnish on a clean paper towel and clean the prop again. |
|
| Your prop’s balance may have changed during the repair process, so give it a quick check in your balance jig. Plan on giving the lighter side an extra coat of varnish during finishing. | 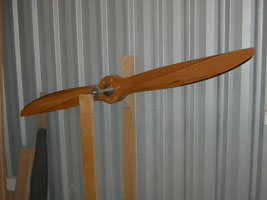 |
| Finally, clean the prop one last time with a tack cloth. These are cleaning cloths that come with a light coating of sticky material that helps pick up the last particles of dust from your prop. You can buy tack cloths from stores that sell automotive paints. Press the tack cloth lightly. Otherwise, the sticky material will gum up your prop. | |
| Now you’re ready to start varnishing, and your prop should look something like this one. Note the smoothly sanded epoxy repair just above and to the right of the label. | 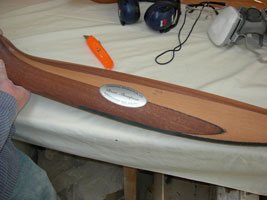 |
| If you have the right kind of marine grade varnish, you could do this with a brush. But you will get a better finish with a gravity fed, automotive spray gun, like this one. | 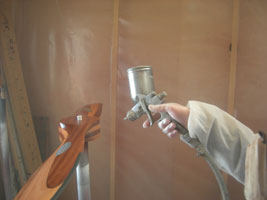 |
| A spray gun does require a bit of practice to get an even finish with no runs. So if you don’t have a spray gun, or haven’t practiced enough to get good, you may want to make friends at your local auto body shop and have them to spray your prop for you. | |
| You’ll need to apply several thin coats, allowing the varnish to dry for about 15 minutes between each spraying session. The right procedure is something like three spraying sessions of three thin coats each for a total of nine thin coats. By the time you get to the third coat, you’ll have a beautifully finished prop. | 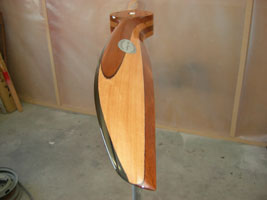 |
|
|
Remember to check the balance one more time just in case one blade requires an extra coat, and then you’ll be ready to go flying!